Optimizing Docker Images with Multistage Builds: A Hugo Portfolio Example
🔧 Curious Engineer with a Passion for Linux, IT, and Open Source | Embracing Innovation and Ready to Make Waves in the Tech World! 🌊
Docker has revolutionized the way we build, package, and deploy applications. However, as projects grow in complexity, the size of Docker images can quickly balloon, leading to slower build times, increased storage requirements, and reduced performance. This is where multistage builds come into play.
Docker images are templates that house the instructions for the associated container. These images are built in read-only layers, and each layer represents a step in the build process. Optimizing these layers is crucial for creating lean and efficient Docker images.
One powerful technique for optimizing Docker images is the use of multistage builds. Multistage builds allow you to separate the build process from the final image, resulting in a smaller and more streamlined container.
Let's explore this concept in detail and use a real-world example of a portfolio website built with Hugo to illustrate the process.
Understanding Docker Images and Layers
Before diving into multistage builds, let's briefly discuss what Docker image is and how Docker images work.
What is Docker Image?
A Docker image is a lightweight, stand-alone, executable package that includes everything needed to run a piece of software, including the code, a runtime, libraries, environment variables, and config files.
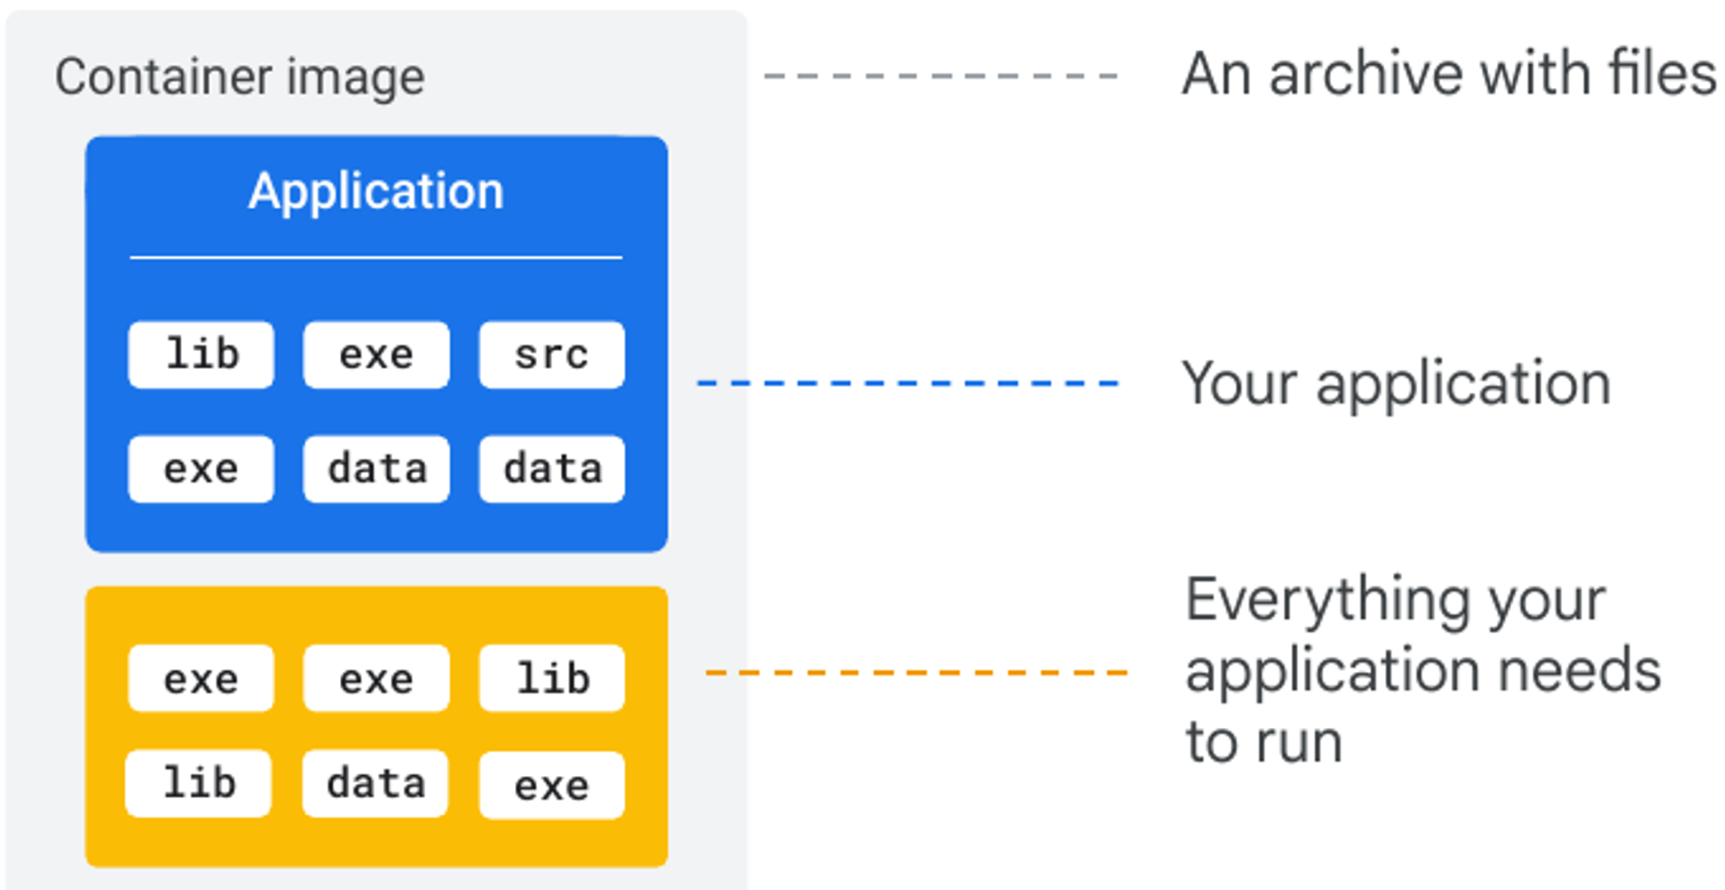
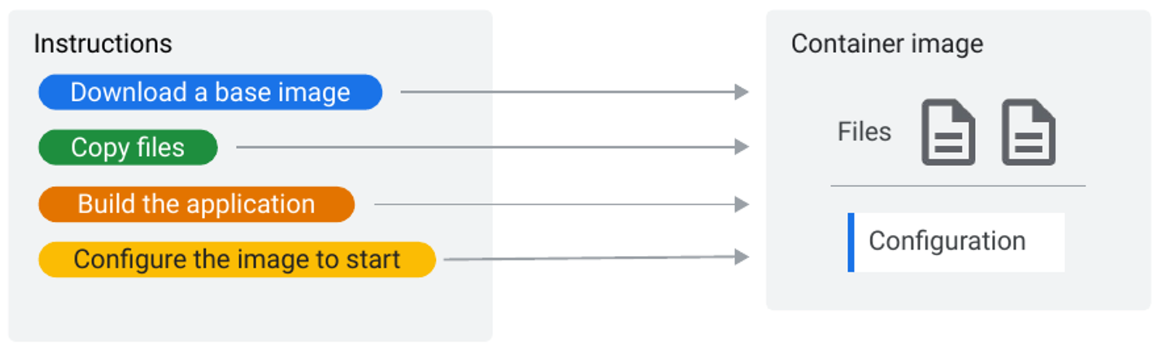
A Docker image is built using a series of instructions defined in a Dockerfile. Each instruction creates a new layer in the image, and these layers are stacked on top of each other. Images contain the code or binary, runtimes, dependencies, and other filesystem objects to run an application. The image relies on the host operating system (OS) kernel.
Docker images are designed to be immutable, meaning that once an image is built, it cannot be changed. Any updates or modifications to the software or environment must be made by creating a new image, rather than modifying the existing one. This makes it easy to roll back to a previous version of the image if necessary, and to deploy the same image consistently across different environments.
When you make changes to your application and rebuild the image, only the modified layers are rebuilt, while the unchanged layers are cached. This layered approach allows for efficient image building and sharing.
There are three specific types of commands that can be used to build and run Dockerfiles:
RUN - To run this command you will need a separate new layer and this command is mainly used to build images and install packages and applications.
CMD - The CMD describes the default container parameters or commands. The user can easily override the default command when you use this.
ENTRYPOINT - A container with an ENTRYPOINT is preferred when you want to define an executable. You can only override it if you use the --entrypoint flag.
The Problem with Monolithic Dockerfiles
Traditionally, Dockerfiles are written as a single, monolithic set of instructions. This approach works well for simple projects, but as the complexity grows, it can lead to several issues:
Why the image is so Large?
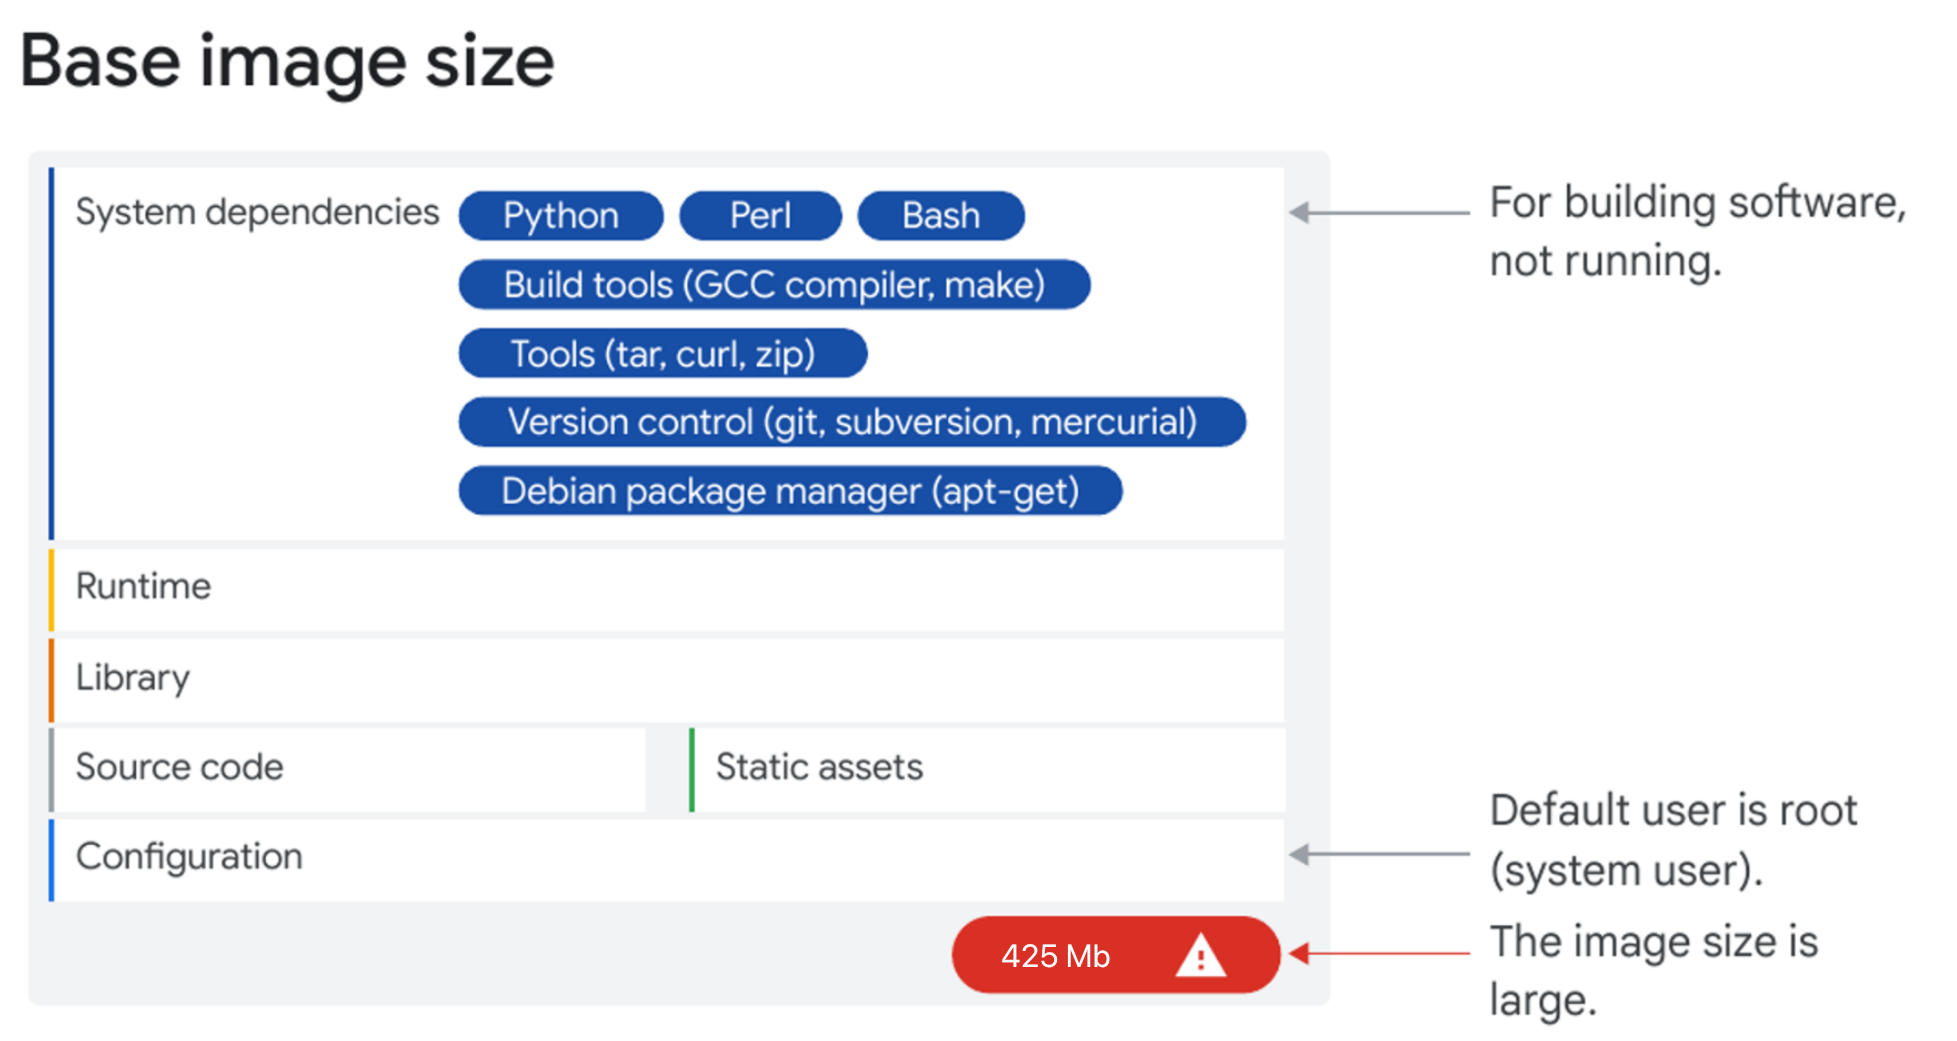
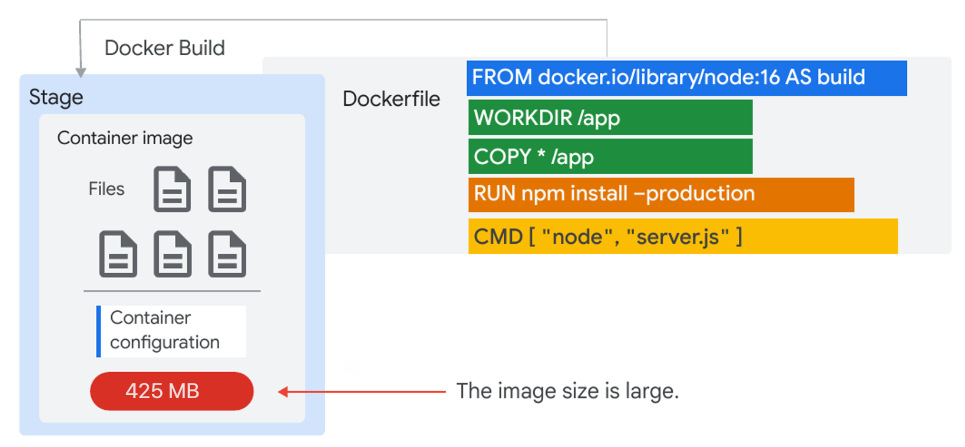
Large Image Sizes: Including all the dependencies, build tools, and artifacts in a single image result in a large image size.
Slow Build Times: Rebuilding the entire image from scratch every time a change is made can be time-consuming.
Security Risks: Unnecessary tools and libraries included in the final image can introduce potential security vulnerabilities.
The solution that Docker has for this problem is a multi-stage image build.
Introducing Multistage Builds (Distroless)
The key to minimizing the size of Docker image is to reduce the number of layers. Multistage builds enable us to achieve this by separating the build process from the final image.
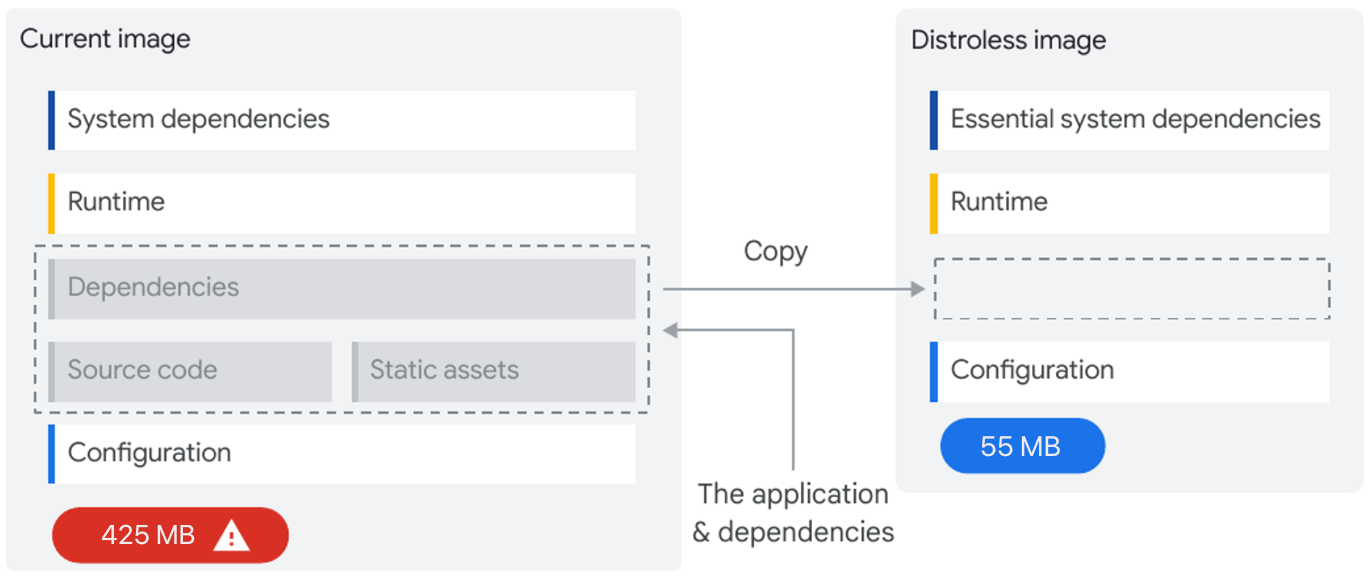
Here's how it works:
Build Stage: In the first stage, you build your application, including all the necessary dependencies and tooling. This stage can be quite large, as it includes the entire build process.
Final Stage: In the second stage, you copy only the necessary artifacts from the build stage and create a smaller, more streamlined image.
By separating these stages, we can ensure that final Docker image only contains the essential components required to run your application, leaving behind the bulky build dependencies.

It involves downloading a new image after initial build is complete, and copying all application files, assets, and library dependencies.
The Project: Portfolio Website with Hugo
Hugo is a fast and modern static site generator written in Go, and it's designed to make website creation simple and efficient. Static site generators like Hugo are an excellent match for Docker, as they produce a set of static files that are easy to serve with a lightweight HTTP server.
The Challenge: Image Size Reduction
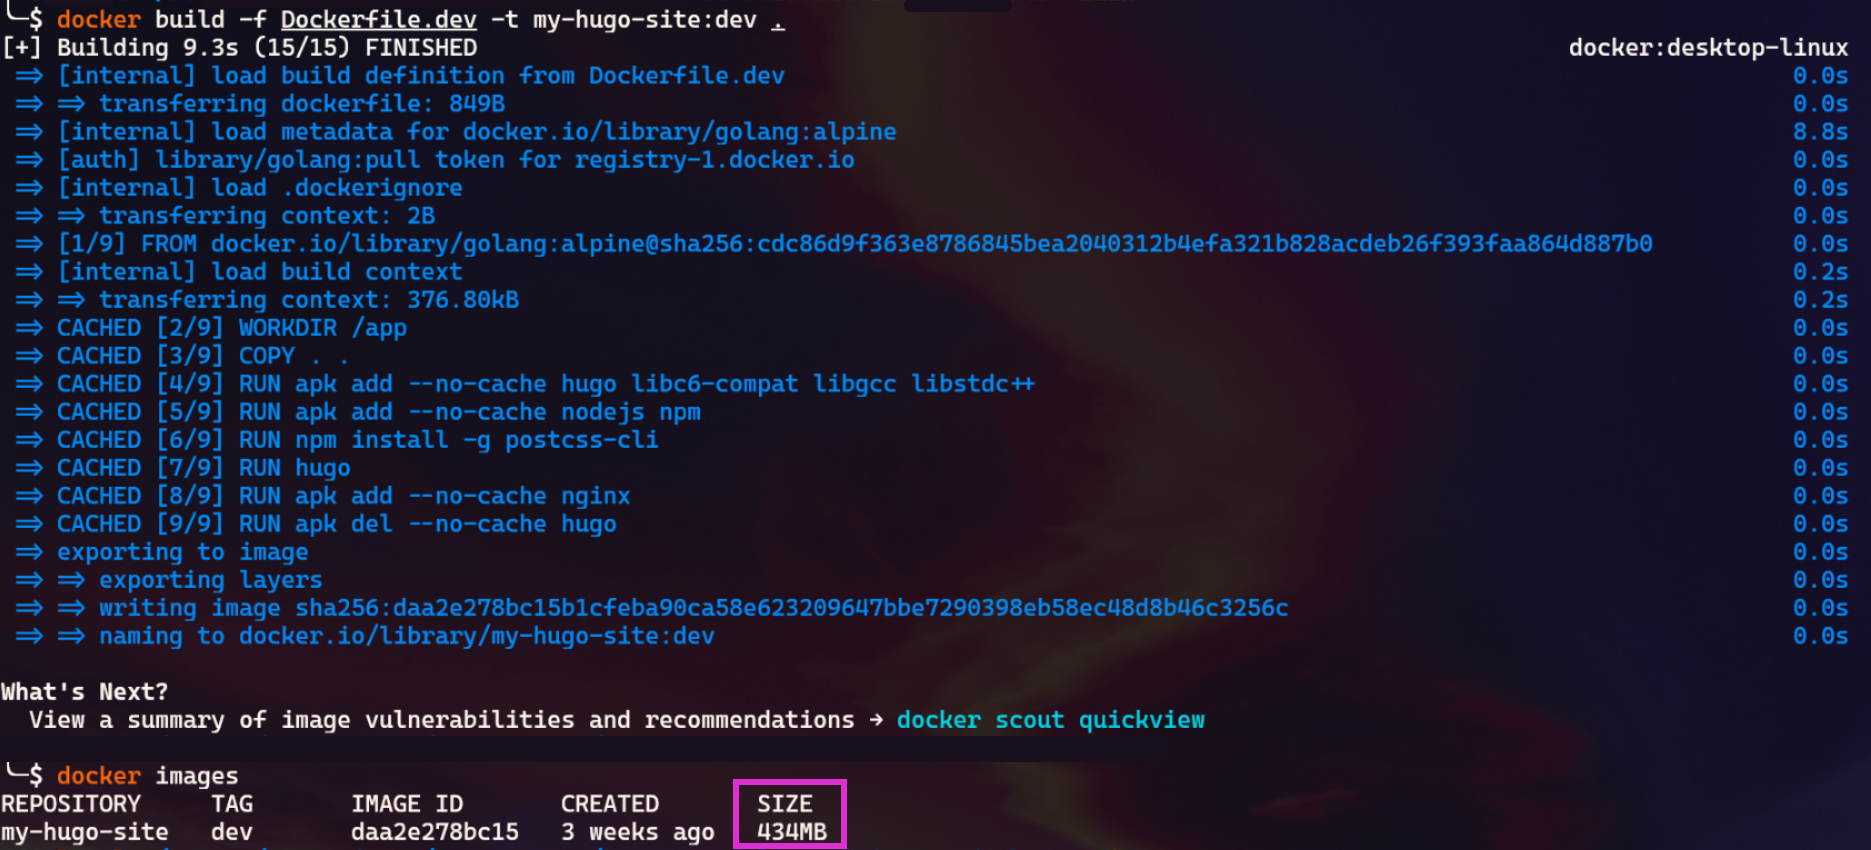
The challenge presented is to optimize a Docker image for a portfolio website created with Hugo. The initial Docker image size is 434MB, which is quite large for a simple portfolio website. The goal is to reduce the image size without sacrificing functionality.
To tackle this challenge, two Dockerfiles are created: one for development (dev) and one for production (prod). The production Dockerfile is a Multistage build designed for image optimization.
Development Dockerfile
The development Dockerfile is a standard build, containing all the necessary tools and dependencies for a development environment. The development Dockerfile included everything needed to build the Hugo site, including the full Hugo binary, a web server for testing, and various other dependencies.
FROM golang:alpine

# Set the working directory
WORKDIR /app

# Copy your Hugo project files
COPY . .

# Install Hugo and compatibility libraries
RUN apk add --no-cache hugo libc6-compat libgcc libstdc++

# Install Node.js and npm
RUN apk add --no-cache nodejs npm

# Install PostCSS for Hugo
RUN npm install -g postcss-cli

# Generate your website's static content
RUN hugo

# Install NGINX
RUN apk add --no-cache nginx

# Optional: Copy your custom Nginx configuration if needed
# COPY nginx.conf /etc/nginx/nginx.conf

# Remove Hugo and any build dependencies (optional, for size reduction)
RUN apk del --no-cache hugo

# Expose the port NGINX uses
EXPOSE 80

# Command to start NGINX when the container runs
CMD ["nginx", "-g", "daemon off;"]
Explanation:
Base Image: The Dockerfile starts by using the
golang:alpinebase image, which is a minimal and lightweight version of the Go programming language runtime environment based on the Alpine Linux distribution.Working Directory: The
WORKDIR /appcommand sets the working directory inside the container to/app, which is where the project files will be copied.Copying Project Files: The
COPY . .command copies all the files and directories from the current context (your local machine) to the/appdirectory inside the container.Installing Hugo and Dependencies: The
RUN apk add --no-cache hugo libc6-compat libgcc libstdc++command installs the Hugo static site generator and its required compatibility libraries on the Alpine Linux system.Installing Node.js and npm: The
RUN apk add --no-cache nodejs npmcommand installs Node.js and npm, which are required for the PostCSS installation in the next step.Installing PostCSS: The
RUN npm install -g postcss-clicommand installs the PostCSS command-line interface globally, which is used for processing CSS files.Generating Static Content: The
RUN hugocommand generates the static content of the Hugo website.Installing NGINX: The
RUN apk add --no-cache nginxcommand installs the NGINX web server, which will be used to serve the generated static content.Removing Hugo and Build Dependencies: The
RUN apk del --no-cache hugocommand removes the Hugo package and any build dependencies to reduce the overall size of the final Docker image.Exposing Port: The
EXPOSE 80command exposes port 80 on the container, which is the default port for the NGINX web server.Starting NGINX: The
CMD ["nginx", "-g", "daemon off;"]command specifies the command to be executed when the container starts, which is to run the NGINX web server in the foreground.
This Dockerfile sets up a complete environment for building and serving a Hugo-based website using the Go programming language and the Alpine Linux distribution. It installs the necessary dependencies, generates the static content, and sets up NGINX to serve the website.
To build image run:
  docker build -f Dockerfile.dev -t my-hugo-site:dev .
  docker images
The Solution: Implementing Multistage Dockerfiles
Production Dockerfile: Multistage Build
The production Dockerfile is where the magic happened. It is divided into multiple stages:
Build Stage: This stage installed Hugo and built the static website.
Optimization Stage: Here, unnecessary files and dependencies are removed.
Final Stage: The last stage copied only the necessary artifacts from the previous stages, resulting in a much lighter image.
# Stage 1: Build Stage
FROM golang:alpine AS build

# Set the working directory within the container
WORKDIR /app

# Copy your Hugo project files
COPY . .

# Install Hugo
RUN apk add --no-cache hugo

# Install Node.js and npm (npm includes npx)
RUN apk add --no-cache nodejs npm

# Install PostCSS
RUN npm install -g postcss-cli

# Generate your website's static content
RUN hugo

# Stage 2: Web Server Stage
FROM nginx:alpine

# Set NGINX's default serving directory
WORKDIR /usr/share/nginx/html

# Copy the generated static website from the build stage
COPY --from=build /app/public /usr/share/nginx/html

# Optional: Copy your custom Nginx configuration if needed
# COPY nginx.conf /etc/nginx/nginx.conf

# Expose the port NGINX uses
EXPOSE 8080

# Command to start NGINX when the container runs
CMD ["nginx", "-g", "daemon off;"]

#env var
ENV NODE_ENV=production \
HOSTNAME="0.0.0.0" \
NEXT_TELEMETRY_DISABLED=1
Explanation:
This Prod Dockerfile uses a multi-stage build approach to create a Docker image for a Hugo-based website. Let's break it down step by step:
Stage 1: Build Stage
Base Image: The first stage uses the
golang:alpinebase image, which is a minimal and lightweight version of the Go programming language runtime environment based on the Alpine Linux distribution.Working Directory: The
WORKDIR /appcommand sets the working directory inside the container to/app, where the project files will be copied.Copying Project Files: The
COPY . .command copies all the files and directories from the current context (your local machine) to the/appdirectory inside the container.Installing Hugo: The
RUN apk add --no-cache hugocommand installs the Hugo static site generator on the Alpine Linux system.Installing Node.js and npm: The
RUN apk add --no-cache nodejs npmcommand installs Node.js and npm, which are required for the PostCSS installation in the next step.Installing PostCSS: The
RUN npm install -g postcss-clicommand installs the PostCSS command-line interface, which is used for processing CSS files.Generating Static Content: The
RUN hugocommand generates the static content of the Hugo website.
Stage 2: Web Server Stage
Base Image: The second stage uses the
nginx:alpinebase image, which is a minimal and lightweight version of the NGINX web server based on the Alpine Linux distribution.Working Directory: The
WORKDIR /usr/share/nginx/htmlcommand sets the working directory inside the container to the default NGINX serving directory.Copying Static Content: The
COPY --from=build /app/public /usr/share/nginx/htmlcommand copies the generated static content from the previous build stage to the NGINX serving directory.Exposing Port: The
EXPOSE 8080command exposes port 8080 on the container, which is the default port for the NGINX web server.Starting NGINX: The
CMD ["nginx", "-g", "daemon off;"]command specifies the command to be executed when the container starts, which is to run the NGINX web server in the foreground.Environment Variables: The
ENVcommand sets three environment variables:NODE_ENV=production: Sets the Node.js environment to production mode.HOSTNAME="0.0.0.0": Sets the hostname to "0.0.0.0".NEXT_TELEMETRY_DISABLED=1: Disables Next.js telemetry.
This Dockerfile uses a multi-stage build approach to create a Docker image for a Hugo-based website. The first stage builds the static content using Go, Hugo, and PostCSS, while the second stage sets up the NGINX web server to serve the generated content. The resulting image is a lightweight and production-ready container for the Hugo website.
To build image run:
  docker build -f Dockerfile.dev -t my-hugo-site:dev .
  docker images

The Results: A Dramatic Reduction
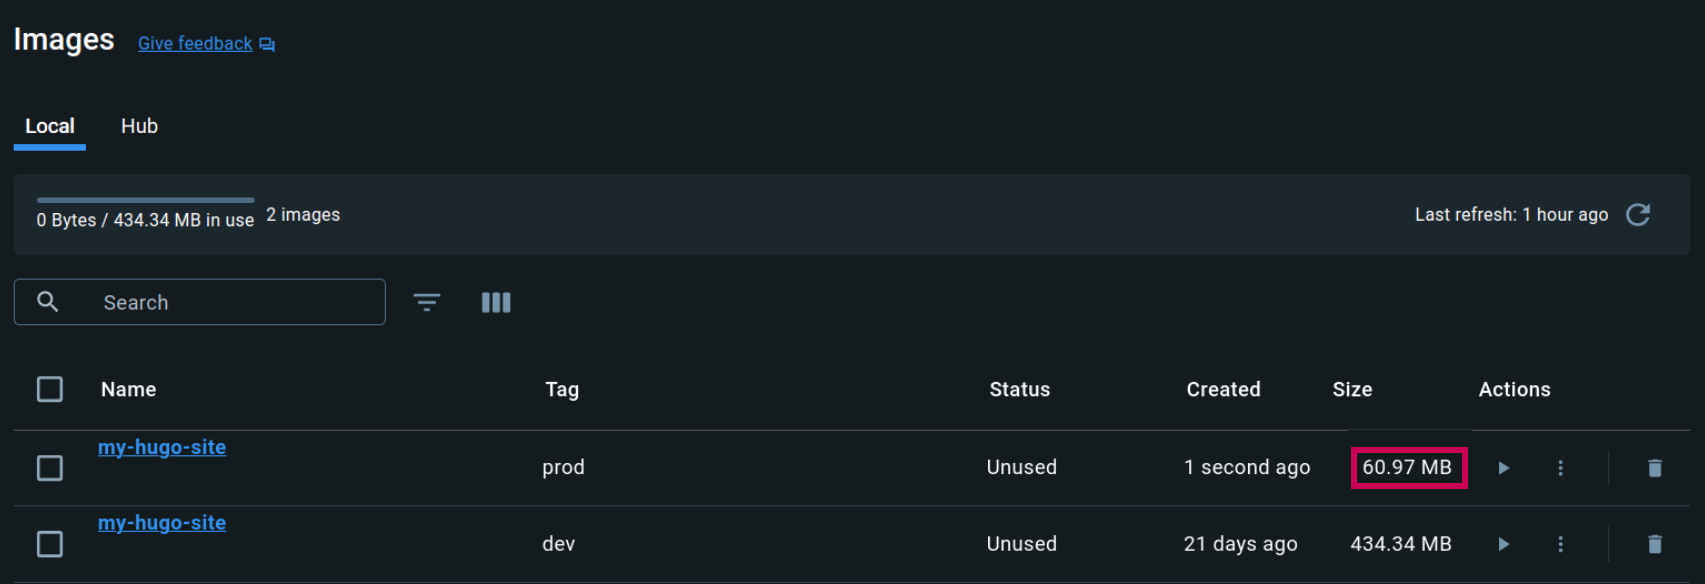
By implementing Multistage builds, the final production image size is reduced from 434MB to an impressive 61MB. This not only makes the image easier to handle and quicker to deploy but also reduces the attack surface for potential security vulnerabilities.
How You Can Achieve Similar Results
To achieve similar results, consider the following steps:
Analyze Your Current Dockerfile: Understand what is necessary for your application to run.
Implement Multistage Builds: Use separate stages for building and optimizing your Docker image.
Optimize Your Artifacts: Be selective about what you copy into your final image.
Iterate and Test: Continuously test your Docker images to ensure functionality while optimizing.
Conclusion
Docker image optimization is both an art and a science. By leveraging Multistage builds and being mindful of the artifacts included in the final image, significant efficiencies can be realized. This case study with a Hugo-based portfolio website demonstrates the potential for optimization, reducing the image size by nearly 90% without compromising on functionality.
Remember, the key to optimization is understanding your application's requirements and continuously iterating on your Dockerfile to find the perfect balance between functionality and efficiency. Happy Dockering!