3-tier Architecture Multi-Environment Deployment using Terraform, Jenkins, Docker, and GKE
🔧 Curious Engineer with a Passion for Linux, IT, and Open Source | Embracing Innovation and Ready to Make Waves in the Tech World! 🌊
In the fast-paced world of software development, the ability to deploy applications efficiently and securely is a critical skill. In this project we'll explores the Application Deployment through the lens of modern DevOps practices, showcasing a powerful multi-environment deployment pipeline for a full-stack web application.
At the heart of this project is Yelp Camp, a feature-rich website for campground reviews. This application serves as an ideal candidate for demonstrating advanced deployment techniques, incorporating diverse technologies such as Cloudinary for image storage, Atlas DB for user data management, and MapBox APIs for interactive location mapping.
We'll dive deep into the setup and configuration of each component, exploring best practices and overcoming common challenges in multi-environment deployments.
Project Objectives
The primary goal of this project is to implement a robust 3-tier architecture, ensuring scalability, maintainability, and security. To achieve this, I've leveraged a suite of cutting-edge tools:
Terraform: For infrastructure as code, allowing us to define and provision our deployment environments consistently and reproducibly.
Jenkins: Powering our continuous integration and continuous deployment (CI/CD) pipeline, automating build, test, and deployment processes.
Docker: Containerizing our application components for improved portability and resource efficiency.
Trivy: Integrated for comprehensive vulnerability scanning of container images and filesystems, enhancing our security posture.
SonarQube: Employed for continuous inspection of code quality, helping maintain high standards throughout the development process.
Google Kubernetes Engine (GKE): Orchestrating our containerized application, providing scalability and simplified management in a cloud environment.
Pipeline incorporates multiple stages, including local deployment for testing, development and production environments with distinct security and quality checks. We will utilize Trivy for both filesystem and image scanning, ensuring that our application and its dependencies are free from known vulnerabilities. SonarQube analysis is performed to maintain code quality and identify potential issues early in the development cycle.
How we will achieve our objectives:
Creating three separate environments (
test,dev,prod) and use modular approach for resource creation using Terraform and deploying the application across these environments.Test Environment: Setting up a local development environment for testing the Yelp-Camp application (done on a GCP Compute Engine).
Dev Environment: Building and deploying the application in a Docker container using a CI/CD pipeline.
Prod Environment: Automating deployment of the application to a Google Kubernetes Engine (GKE) cluster through a CI/CD pipeline.
Leveraging automation wherever possible, including the use of GCP's metadata feature and startup scripts to install all necessary tools.
%[https://github.com/ChetanThapliyal/3-tier-architecture-deployment-GKE/tree/main]
Architecture Diagram
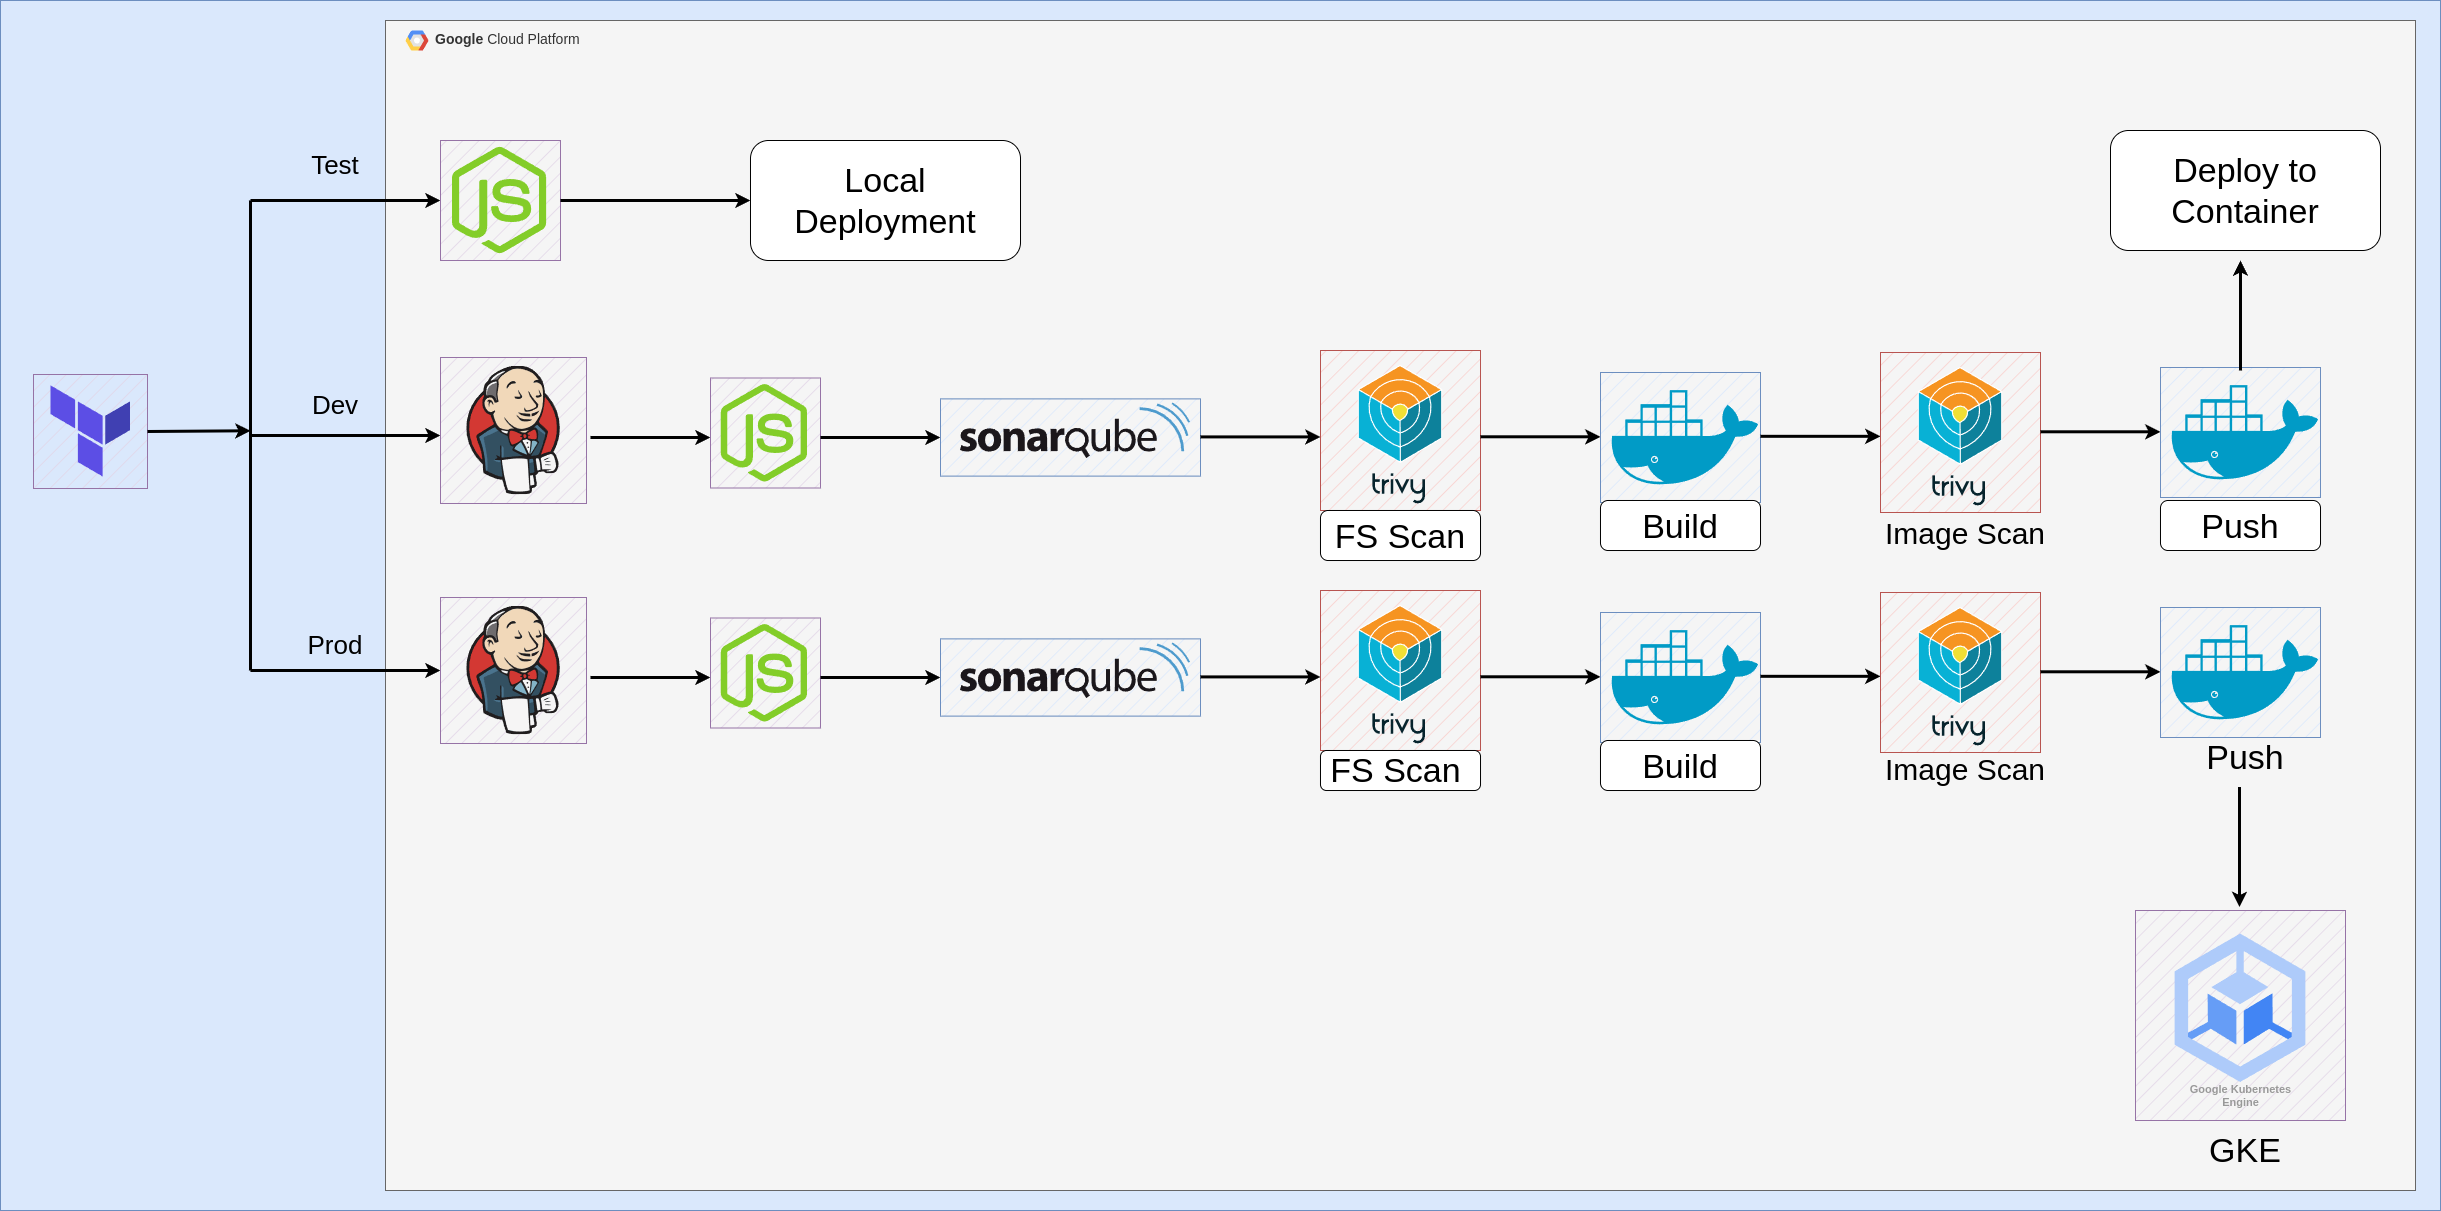
The architecture is designed to ensure smooth transitions from development to production. Here's a high-level overview of the setup:
Test Environment: Developers check if the application is running locally.
Dev Environment: Uses Jenkins for continuous integration and deployment, incorporating SonarQube for code quality checks and Trivy for security scans. Docker images are built and pushed to a container registry.
Prod Environment: Reuses the CI/CD pipeline to deploy the Docker images on GKE, ensuring the application is production-ready.
Setting Up the Infrastructure & Environments
Creating Infrastructure
Terraform Environment:
Ensure Terraform is installed on system.
Set up GCP credentials and configure the Google Cloud SDK (
gcloud).
API's, Secrets and Keys used in YelpCamp
Cloudinary Credentials (for storing Campground Images)
Signup to https://cloudinary.com and since our application uses NodeJS, copy the credentials in local text file or somewhere safe.
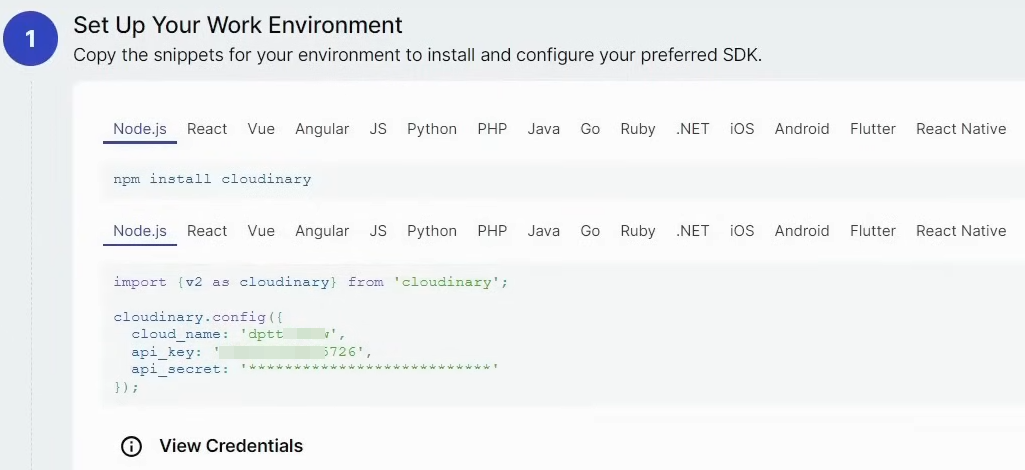
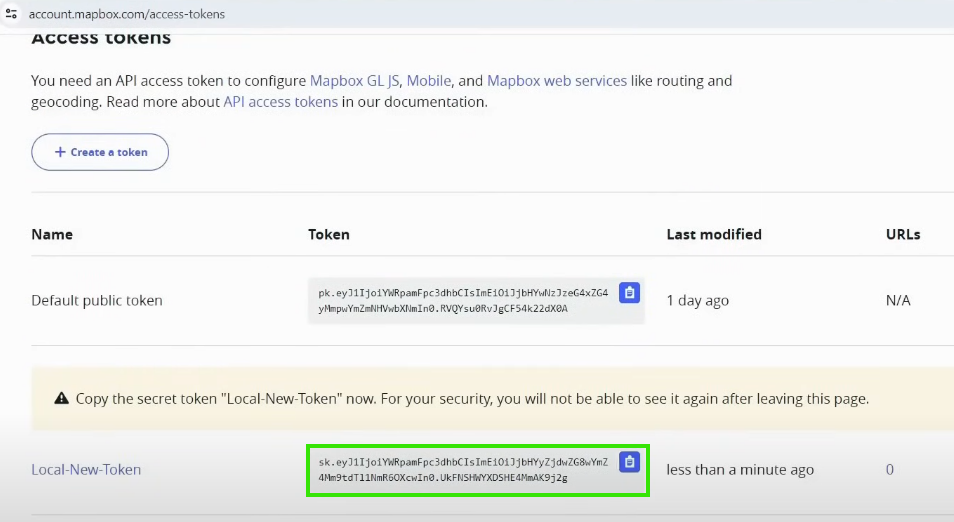
Mapbox API key for Location:
Signup to https://www.mapbox.com and generate access token and copy the credentials in local text file or somewhere safe.
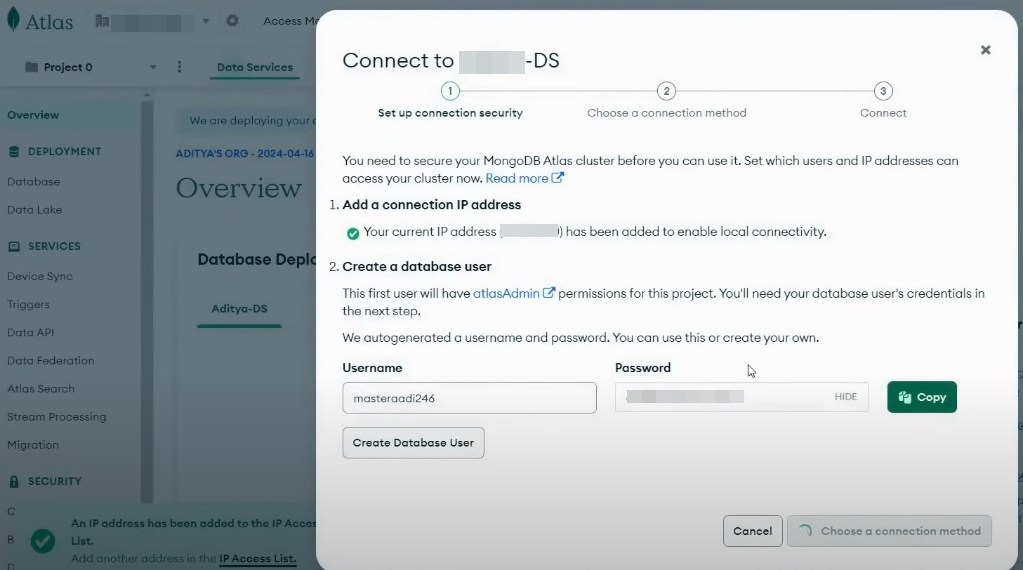
MongoDB Atlas URL for storing the Admin and User data.
Signup to https://www.mongodb.com/cloud/atlas/register and 1st copy Database User's -> Username and Password and Create DB user.
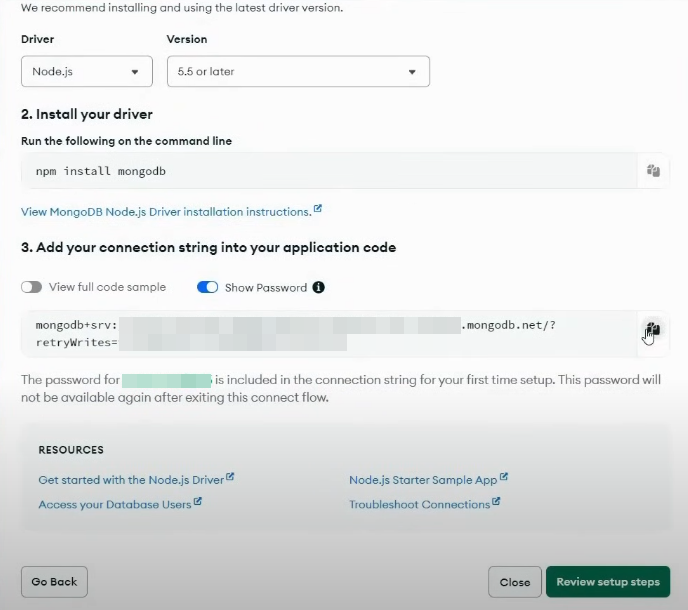
Next connect to DB using Drivers option and than copy the connection string which we will use to connect App to DB: (since there are multiple strings in it save it under double quotes. Ex. "mongo_srv://........." )
Now by default this DB is accessible from only your current IP Address, so to access it from other locations we'll add 0.0.0.0/0 in Access List Entry so that it can be accessible from anywhere. (For security add only the IP addresses where you want access to DB):
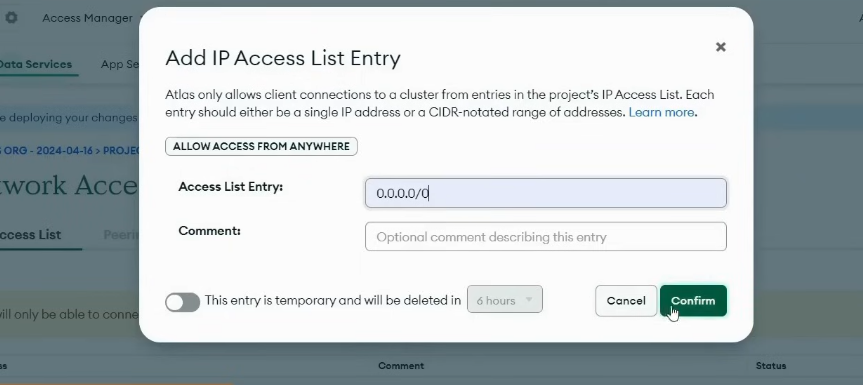
Project Structure
tree -L 4
── Infra
│   ├── environments
│   │   ├── dev
│   │   ├── prod
│   │   └── test
│   ├── modules
│   │   ├── compute
│   │   ├── firewall
│   │   ├── gke
│   │   └── network
│   ├── scripts
│   │   ├── jenkins.sh
│   │   ├── nodejs.sh
│   │   └── sonarqube.sh
│   ├── secrets
│   │   ├── credentials.json
│   │   └── db.md
│   ├── main.tf
│   ├── variables.tf
│   ├── providers.tf
|   ├── terraform.tfvars
│   └── outputs.tf
├── k8
│   └── deployment.yaml
├── LICENSE
├── README.md
└── src(Project Files)
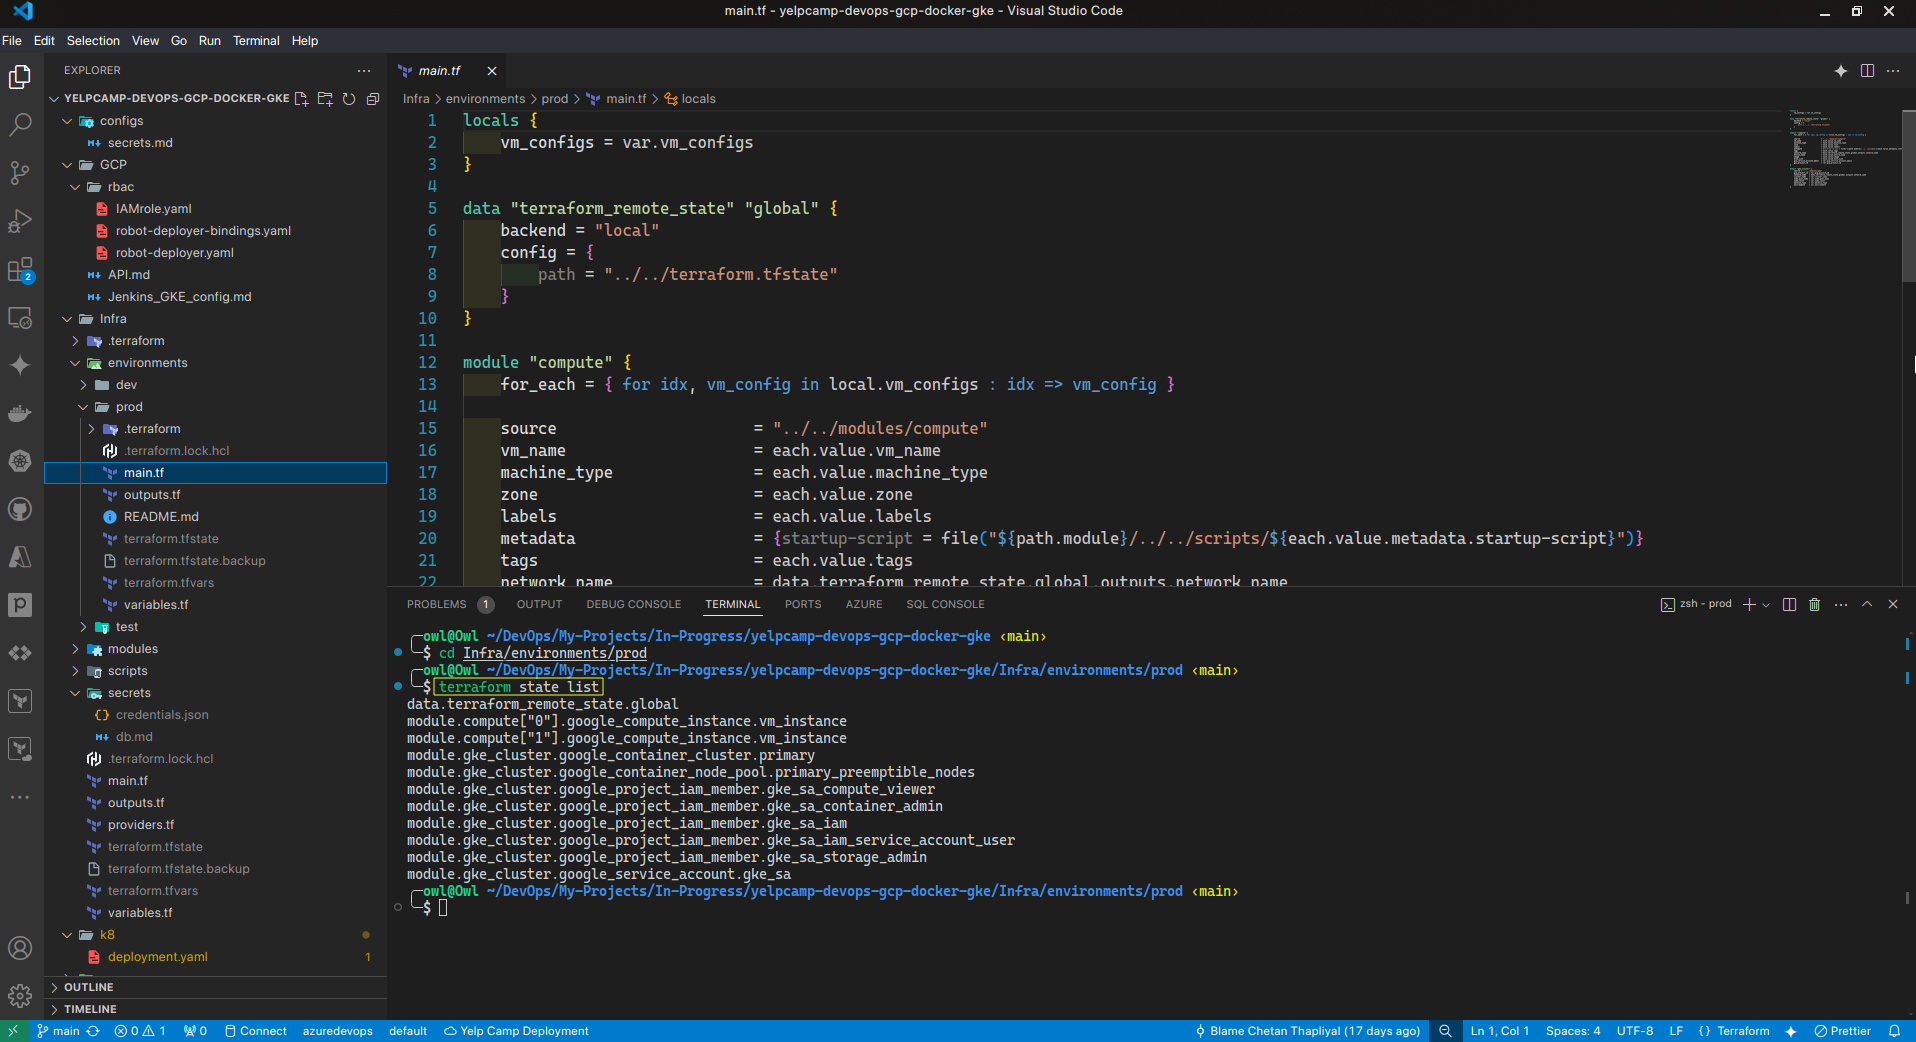
To replicate similar project structure simply clone repo:
  git clone https://github.com/ChetanThapliyal/3-tier-architecture-deployment-GKE.git
  cd 3-tier-architecture-deployment-GKE/Infra
  #Create a terraform.tfvars file for each environment
  #(test, dev, prod and global) with the necessary variables.
  terraform init
  # for custom ports variable set it to:
  # custom_ports = ["80", "443", "465", "6443", "3000-10000", "30000-32767"]
  # ssh_ports = ["22"]
  terraform apply

  cd environments/test
  terraform init
  terraform apply
  #Repeat same steps for dev and prod.
The above commands will create Infrastructure of all 3 environments with a global VPC.
Now let's configure each environment and understand what we created.
Configuring each Environment
Understanding Global VPC
We used one single VPC and same firewall rules for all 3 environments, it full-fills our project needs.
Advancement: We can create seperate subnets for each env or create seperate VPC for each env.
Ports that are needed for this project:
  `22`: SSH
  `80`: HTTP
  `443`: HTTPS
  `465`: SMTP (for sending emails from Jenkins to Personal email IDs)
  `6443`: For setting up kubernetes cluster
  `3000-10000`: Application ports
  `30000-32767`: Kubernetes cluster ports for application deployment
Test Environment
In the Test environment, the application is deployed locally, in this case in a GCP compute engine. This step allows developers to ensure that the basic functionality is intact before moving on to more complex environments.
For test environment I have spinned up a compute engine with Ubuntu image and machine type of
e2-smalland disk size of 10GB.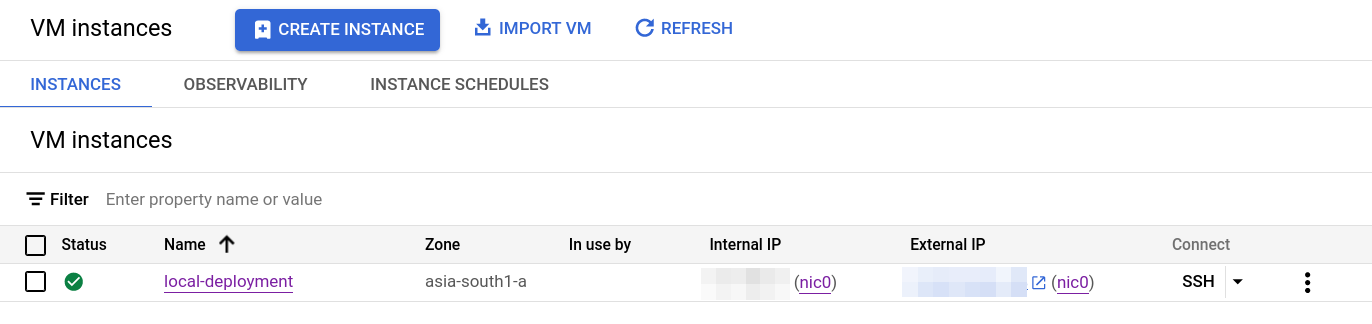
I have leveraged Google Clouds metadata function to update the system, install NodeJS and clone our project.
SSH into server and run following commands to access
npm:export NVM_DIR="/opt/nodejs/.nvm" && source "$NVM_DIR/nvm.sh" cd /opt/3-tier-architecture-deployment-GKE vi .env #add API's, Secrets and Keys we copied in previous step # Example: CLOUDINARY_CLOUD_NAME="fill values here" npm start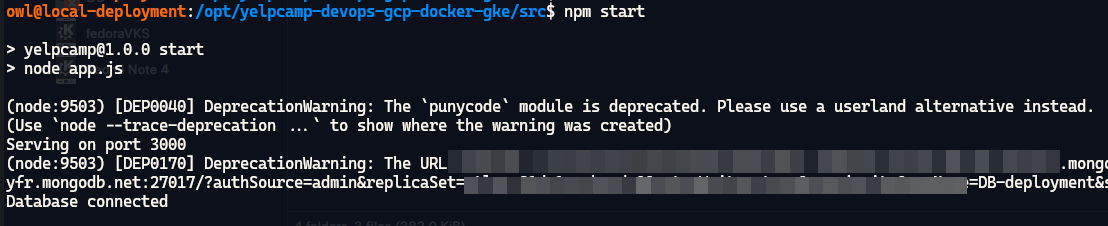
Access the application at
http://ExternalIP:3000/, add user, campgrounds and check AtlasDB and cloudinary if everything is working.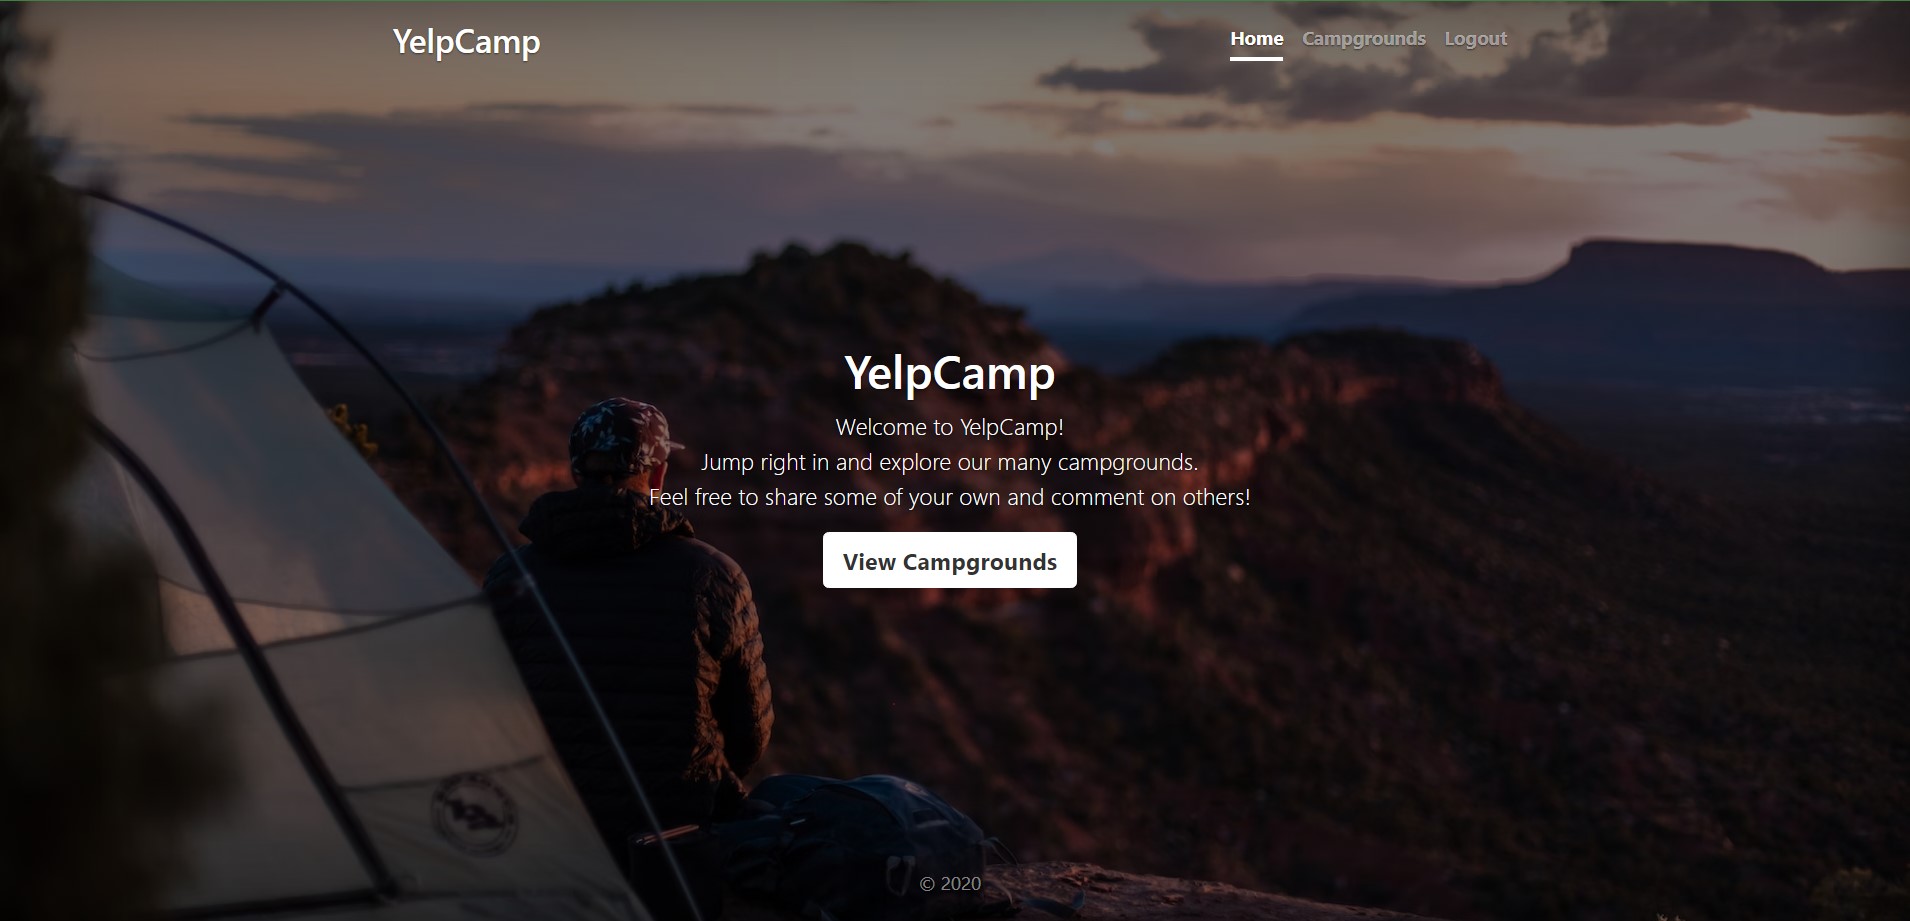
Dev Environment
The Dev environment is where the CI/CD magic happens. Here’s how the pipeline is configured:
Code Quality and Security: Jenkins triggers SonarQube to perform static code analysis, and Trivy scans the file system for vulnerabilities.
Building Docker Images: Jenkins builds the Docker images and performs an image scan using Trivy.
Pushing to Registry: The Docker images are pushed to a container registry (Dockerhub).
Infrastructure
I have created 2 VM's, one for Jenkins+Docker+Trivy and other for SonarQube.
SonarQube is running as a Docker container and can be accessed at
http://IP:9000.- Initial password and user name
Jenkins can be accessed at port
8080.- Copy the initial password and login to server.
Again all tools are installed through scripts when VM's are created, we just need to configure the tools.
Creating Dockerfile for app
I have created a simple Dockerfile which will be used to containerize our app:
  # Use Node 18 as parent image
  FROM node:18

  # Change the working directory on the Docker image to /app
  WORKDIR /app

  # Copy package.json and package-lock.json to the /app directory
  COPY package.json package-lock.json ./

  # Install dependencies
  RUN npm install

  # Copy the rest of project files into this image
  COPY . .

  # Expose application port
  EXPOSE 3000

  # Start the application
  CMD npm start
Configuring Jenkins (same config for Prod environment)
Minimum Jenkins version: 2.164.2
Jenkins plugin dependencies:
google-oauth-plugin: 0.7 (pre-installation required)
workflow-step-api: 2.19
pipeline-model-definition: 1.3.8 (pre-installation required for Pipeline DSL support)
git: 3.9.3
junit: 1.3
structs: 1.17
credentials: 2.1.16
kubernetes : latest
kubernetes cli : latest
nodejs : latest
sonarqube scanner : latest
docker : latest
docker pipeline : latest
Plugin for Trivy is not available so directly install it on Jenkins Server.
Setup
Tools
Go to
Manage Jenkins->ToolsConfig
SonarQube Scanner
Config
Docker
Config
NodeJS
Config Credentials for Pipeline
Config SonarQube with Jenkins
Generate Token
Login to
SonarQube server->Administration->Security->Users->Tokens-> Give Name andGenerate
Copy Token -> Go to
Jenkins->Manage Jenkins->Credentials->Global->Add Credentials->Kind->Secret Text
Connect Sonarqube Server with Jenkins
Go to
Jenkins->Manage Jenkins->System->SonarQube servers->Add SonarQubeGive name to server, add Server IP in
Server URLfield and selectServer Authentication tokenthat we configured in above step.
Config Githup with Jenkins
Generate
Github Tokenand Copy Token -> Go toJenkins->Manage Jenkins->Credentials->Global->Add Credentials->Kind->Username and PasswordAdd your github
Usernameand inPasswordsection pastetoken.
If you don't know how to generate Github Token follow this documentation https://docs.github.com/en/authentication/keeping-your-account-and-data-secure/managing-your-personal-access-tokens
Config Docker with Jenkins
Generate
Docker Access Tokenand Copy Token -> Go toJenkins->Manage Jenkins->Credentials->Global->Add Credentials->Kind->Username and PasswordAdd your Dockerhub
Usernameand inPasswordsection pasteAccess token.
Doker Access Token : https://docs.docker.com/security/for-developers/access-tokens/
Creating Pipeline
Now our Infra is build and tools are configured, now we'll build the pipeline. Go to Jenkins Dashboard and Create New Job -> Pipeline (give name to pipeline)
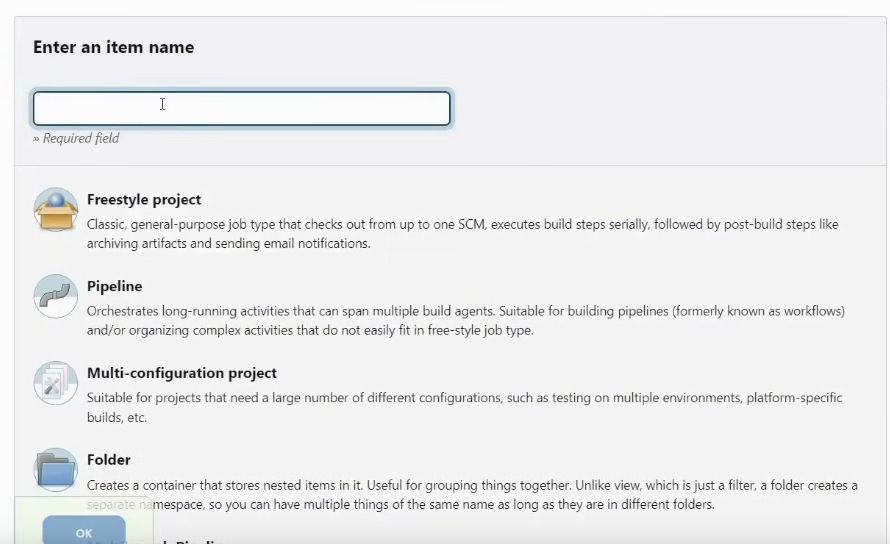
Following best practices, Discard Old builds and keep 2 maximum builds.
Pipeline steps for Dev:
  pipeline {
      agent any
      tools {
          nodejs 'nodeDev'
      }
      environment {
          SCANNER_HOME= tool 'sonar-dev'
      }

      stages {
          stage('Git Checkout') {
              steps {
                  git branch: 'main', credentialsId: 'git-cred', url: 'https://github.com/$GITHUB_USERNAME/YelpCampAPP'
              }
          }

          stage('Install Package Dependencies') {
              steps {
                  sh "npm install"
              }
          }

          stage('Unit Tests') {
              steps {
                  sh "npm test"
              }
          }

          stage('Trivy FS Scan') {
              steps {
                  sh "trivy fs --format table -o fs-report.html ."
              }
          }

          stage('Sonarqube') {
              steps {
                  withSonarQubeEnv('sonar') {
                      sh "$SCANNER_HOME/bin/sonar-scanner -Dsonar.projectKey=Campground -Dsonar.projectName=Campground"
                  }
              }
          }

          stage('Build and Tag Docker Image') {
              steps {
                  script {
                      withDockerRegistry(credentialsId: 'docker-cred', toolName: 'docker-dev') {
                          sh "docker image build -t $DOCKER_UNAME/camp:latest ."
                      }
                  }
              }
          }

          stage('Docker Image Scan') {
              steps {
                  sh "trivy image --format table -o trivy-image-report.html $DOCKER_UNAME/camp:latest"
              }
          }

          stage('Push Docker Image') {
              steps {
                  script {
                      withDockerRegistry([credentialsId: 'docker-cred', toolName: 'docker-dev']) {
                          sh "docker push $DOCKER_UNAME/camp:latest"
                      }
                  }
              }
          }

          stage('Docker Deployment') {
              steps {
                  script {
                      withDockerRegistry([credentialsId: 'docker-cred', toolName: 'docker-dev']) {
                          sh "docker run -d -p 3000:3000 $DOCKER_UNAME/camp:latest"
                      }
                  }
              }
          }

      }
  }
This pipeline automates the process of building, testing, scanning, and deploying a Yelp Camp application with Docker. Here are the steps:
Pipeline Setup:
Agent: Specifies that the pipeline can run on any available agent.
Tools: Specifies the Node.js environment (named 'nodeDev') and SonarQube scanner (named 'sonar-dev') to be used in the pipeline.
Environment: Sets the
SCANNER_HOMEenvironment variable to the path of the SonarQube scanner tool.
Stages:
Git Checkout:
- Checks out the code from the 'main' branch of the specified GitHub repository using the provided credentials.
Install Package Dependencies:
- Installs the Yelp Camp project dependencies by running
npm install.
- Installs the Yelp Camp project dependencies by running
Unit Tests:
- Executes the unit tests using
npm testto ensure the application code is functioning as expected.
- Executes the unit tests using
Trivy FS Scan:
- Runs a filesystem scan using Trivy to detect vulnerabilities and outputs the results to an HTML report (
fs-report.html).
- Runs a filesystem scan using Trivy to detect vulnerabilities and outputs the results to an HTML report (
SonarQube:
- Performs a code quality analysis using SonarQube. It uses the environment variable
SCANNER_HOMEto locate the SonarQube scanner and specifies the project key and name.
- Performs a code quality analysis using SonarQube. It uses the environment variable
Build and Tag Docker Image:
- Builds a Docker image for the application and tags it with the name
$DOCKER_UNAME/camp:latest. This stage uses Docker registry credentials to access the Docker registry.
- Builds a Docker image for the application and tags it with the name
Docker Image Scan:
- Scans the built Docker image using Trivy for vulnerabilities and outputs the results to an HTML report (
trivy-image-report.html).
- Scans the built Docker image using Trivy for vulnerabilities and outputs the results to an HTML report (
Push Docker Image:
- Pushes the tagged Docker image to the Docker registry using the provided credentials.
Docker Deployment:
- Deploys the Docker image by running a container from the image and mapping port 3000 on the container to port 3000 on the host.
This pipeline ensures that the application is built, tested, scanned for vulnerabilities, and deployed in a structured manner using Jenkins.
You can access the application at
https://IP:3000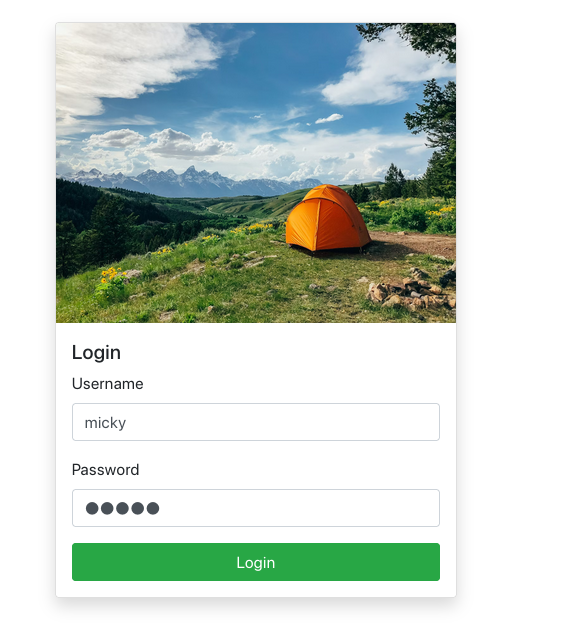
Prod Environment
The Prod environment leverages the same CI/CD pipeline and Infra but deploys the application on GKE. This ensures consistency and reliability in the deployment process.
GKE and kubectl configuration
SSH into Jenkins Prod server and setup necessary env variables:
  export PROJECT=$(gcloud info --format='value(config.project)')
  export CLUSTER=<YOUR_CLUSTER_NAME>
  export ZONE=<YOUR_PROJECTS_ZONE>
  export SA=<YOUR_GCP_SA_NAME>
  export SA_EMAIL=${SA}@${PROJECT}.iam.gserviceaccount.com
Configure target GKE cluster
Retrieve the KubeConfig for your cluster:
gcloud container clusters get-credentials $CLUSTER --zone $ZONE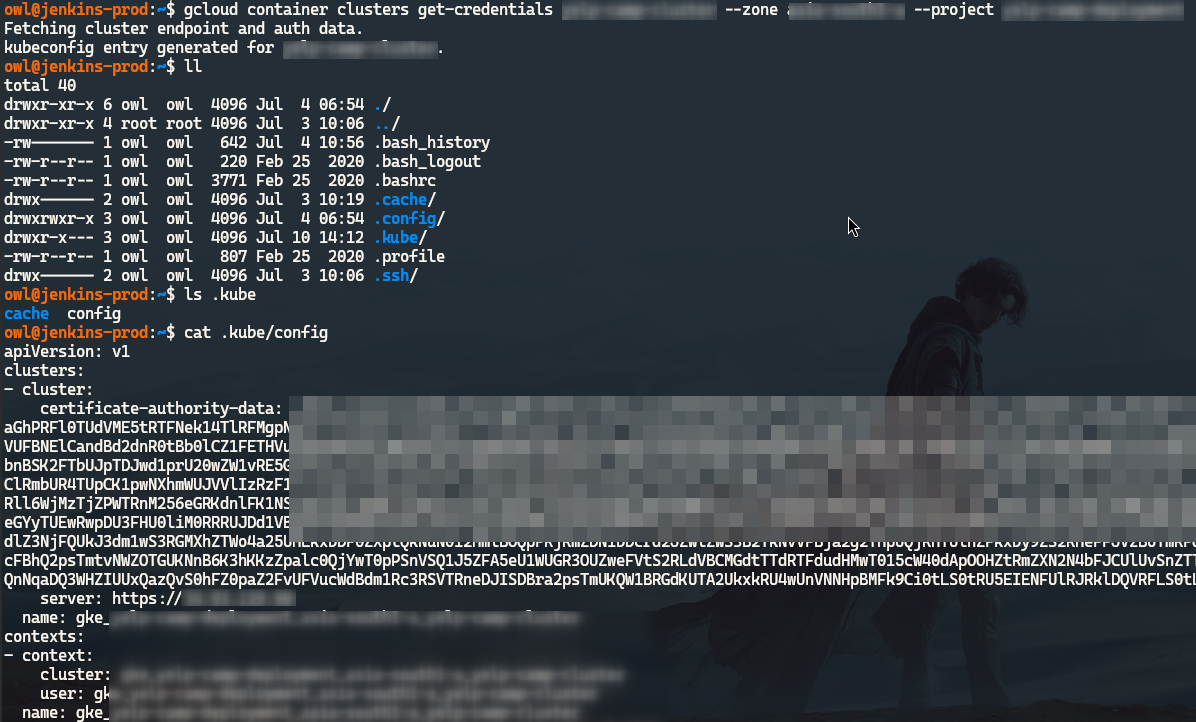
If necessary, grant your GCP login account cluster-admin permissions necessary for creating cluster role bindings:
 kubectl create clusterrolebinding cluster-admin-binding --clusterrole=cluster-admin \
      --user=$(gcloud config get-value account)
Configure GCP Service Account
- We have created Service Account and GKE clusters using Jenkins so we need to just configure it.
Download a JSON Service Account key for your newly created service account. Take note of where the file was created, you will upload it to Jenkins in a subsequent step:
gcloud iam service-accounts keys create ~/jenkins-gke-key.json --iam-account $SA_EMAIL- If using cloud shell, click the 3 vertical dots and Download file, then enter "
jenkins-gke-key.json".
- If using cloud shell, click the 3 vertical dots and Download file, then enter "
In Jenkins on the left side of the screen, click on Credentials, then System.
Click Global credentials then Add credentials on the left.
In the Kind dropdown, select
Google Service Account from private key.Enter your project name, then select your JSON key that was created in the preceding steps.
Click OK.
GKE Cluster RBAC Permissions
Grant your GCP service account a restricted set of RBAC permissions allowing it to deploy to your GKE cluster.
Create the custom robot-deployer cluster role (A role for granting the permissions deemed necessary for deploying to kubernetes) defined within robot-deployer.yaml:
 #robot-deployer.yaml
 apiVersion: rbac.authorization.k8s.io/v1
 kind: ClusterRole
 metadata:
  name: robot-deployer
 rules:
 - apiGroups:
   - extensions
   - apps
   - v1
   resources:
   - containers
   - endpoints
   - services
   - pods
   verbs:
   - create
   - get
   - list
   - patch
   - update
   - watch
kubectl create -f rbac/robot-deployer.yamlGrant your GCP service account the robot-deployer role binding using robot-deployer-bindings.yaml:
 kind: RoleBinding
 apiVersion: rbac.authorization.k8s.io/v1
 metadata:
   name: restricted-rolebinding
   namespace: default
 subjects:
 - kind: User
   name: ${SA_EMAIL}
   namespace: default
 roleRef:
   kind: ClusterRole
   name: robot-deployer
   apiGroup: rbac.authorization.k8s.io
envsubst < rbac/robot-deployer-bindings.yaml | kubectl create -f -
References:
Usage
Google Kubernetes Engine Build Step Configuration
Each GKE Build Step configuration can point to a different GKE cluster. Follow the steps below to create one.
GKE Build Step Parameters
The GKE Build Step has the following parameters:
credentialsId(string): The ID of the credentials that you uploaded earlier.projectId(string): The Project ID housing the GKE cluster to be published to.location(string): The Zone or Region housing the GKE cluster to be published to.clusterName(string): The name of the Cluster to be published to.manifestPattern(string): The file pattern of the Kubernetes manifest to be deployed.verifyDeployments(boolean): [Optional] Whether the plugin will verify deployments.
Jenkins Web UI
On the Jenkins home page, select the project to be published to GKE.
Click Configure from the left nav-bar.
At the bottom of the page there will be a button labeled Add build step, click the button then select
Deploy to Google Kubernetes Engine.In the Service Account Credentials dropdown, select the credentials that you uploaded earlier. This should autopopulate Project ID and Cluster, if not:
Select the Project ID housing the GKE cluster to be published to.
Select the Cluster to be published to.
- Enter the file path of the Kubernetes manifest within your project to be used for deployment.
Jenkins Global Environment Variables
Save following variables in Jenins Global variables:
PROJECT_ID
CLUSTER_NAME
LOCATION
CREDENTIALS_ID
Manage Jenkins->Configure System->Global properties->Environment Variables->Add
Yelp Camp Secrets
Save Yelp Camp secrets in Kubernets:
  kubectl create secret generic yelp-camp-secrets \
      --from-literal=CLOUDINARY_CLOUD_NAME=my-cloud-name \
      --from-literal=CLOUDINARY_KEY=my-cloud-key \
      --from-literal=CLOUDINARY_SECRET=my-cloud-secret \
      --from-literal=MAPBOX_TOKEN=my-mapbox-token \
      --from-literal=DB_URL=my-db-url \
      --from-literal=SECRET=my-secret #write any string for it
Jenkins Declarative Pipeline
Create a file named "Jenkinsfile" in the root of your project.
Within your Jenkinsfile add a step which invokes the GKE plugin's build step class: "KubernetesEngineBuilder". See the example code below:
 pipeline {
     agent any
     tools {
         nodejs 'nodeProd'
     }
     environment {
         SCANNER_HOME = tool 'sonar-prod'
         PROJECT_ID = "${PROJECT_ID}"
         CLUSTER_NAME = "${CLUSTER_NAME}"
         LOCATION = "${LOCATION}"
         CREDENTIALS_ID = 'jenkins-gke-key'
     }

     stages {
         stage('Git Checkout') {
             steps {
                 git branch: 'main', credentialsId: 'git-cred', url: 'https://github.com/$GH_USUSERNAME/YelpCampAPP'
             }
         }

         stage('Install Package Dependencies') {
             steps {
                 sh "npm install"
             }
         }

         stage('Unit Tests') {
             steps {
                 sh "npm test"
             }
         }

         stage('Trivy FS Scan') {
             steps {
                 sh "trivy fs --format table -o fs-report.html ."
             }
         }

         stage('Sonarqube') {
             steps {
                 withSonarQubeEnv('sonar') {
                     sh "$SCANNER_HOME/bin/sonar-scanner -Dsonar.projectKey=Campground -Dsonar.projectName=Campground"
                 }
             }
         }

         stage('Build and Tag Docker Image') {
             steps {
                 script {
                     withDockerRegistry(credentialsId: 'docker-cred', toolName: 'docker-prod') {
                         sh "docker image build -t $DOCKER_USUSERNAME/camp:latest ."
                     }
                 }
             }
         }

         stage('Docker Image Scan') {
             steps {
                 sh "trivy image --format table -o trivy-image-report.html $DOCKER_USUSERNAME/camp:latest"
             }
         }

         stage('Push Docker Image') {
             steps {
                 script {
                     withDockerRegistry([credentialsId: 'docker-cred', toolName: 'docker-prod']) {
                         sh "docker push $DOCKER_USUSERNAME/camp:latest"
                     }
                 }
             }
         }

         stage('Deploy to GKE') {
             steps {
                 step([
                     $class: 'KubernetesEngineBuilder',
                     projectId: env.PROJECT_ID,
                     clusterName: env.CLUSTER_NAME,
                     location: env.LOCATION,
                     manifestPattern: 'k8/deployment.yaml',
                     credentialsId: env.CREDENTIALS_ID,
                     verifyDeployments: true])
                 echo "Deployment Finished"
             }
         }
     }
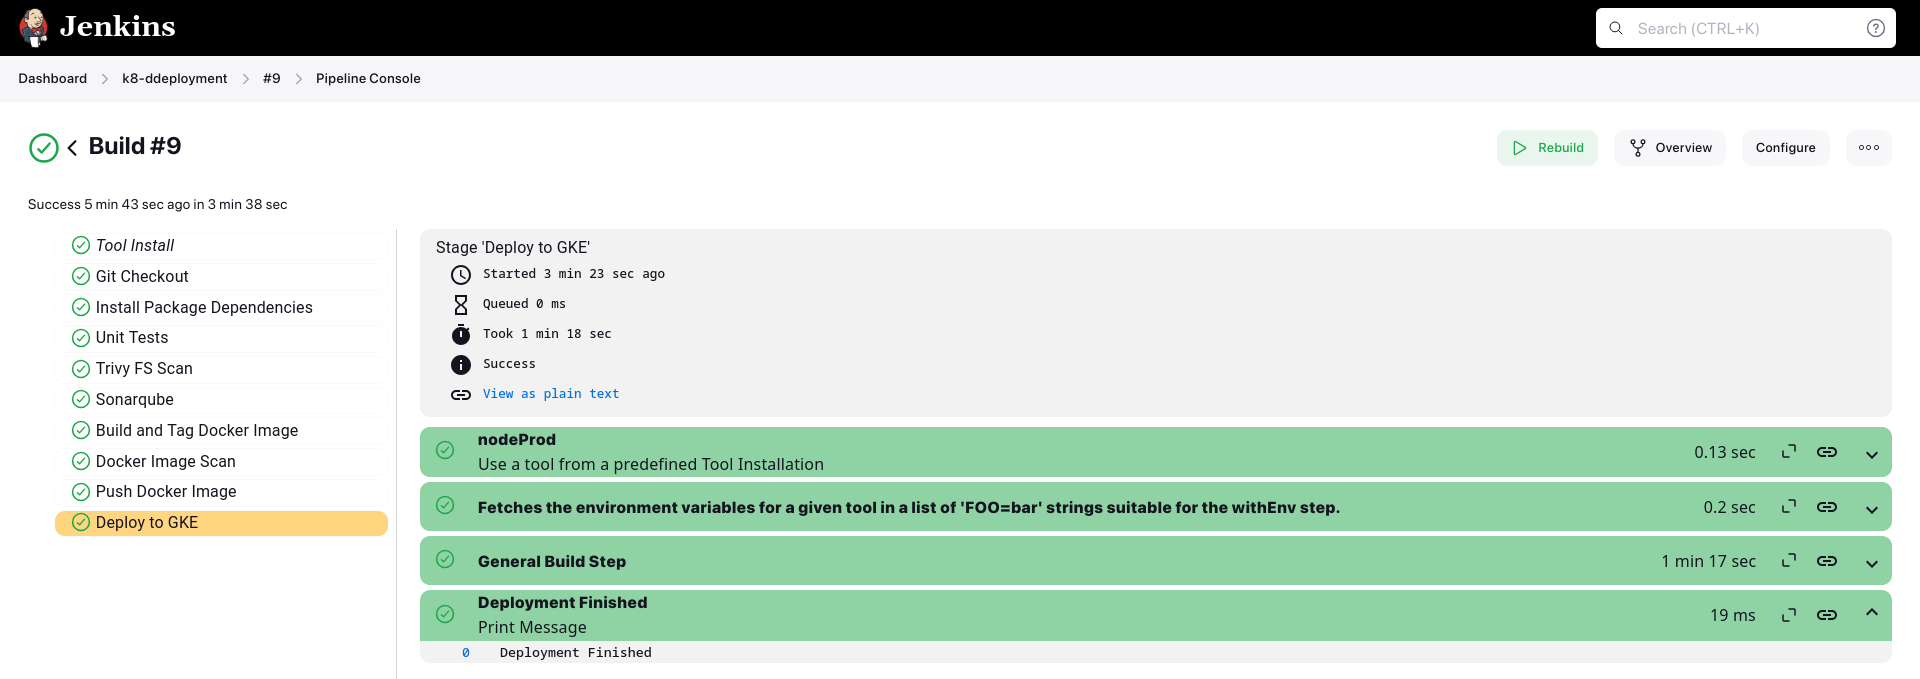
 }
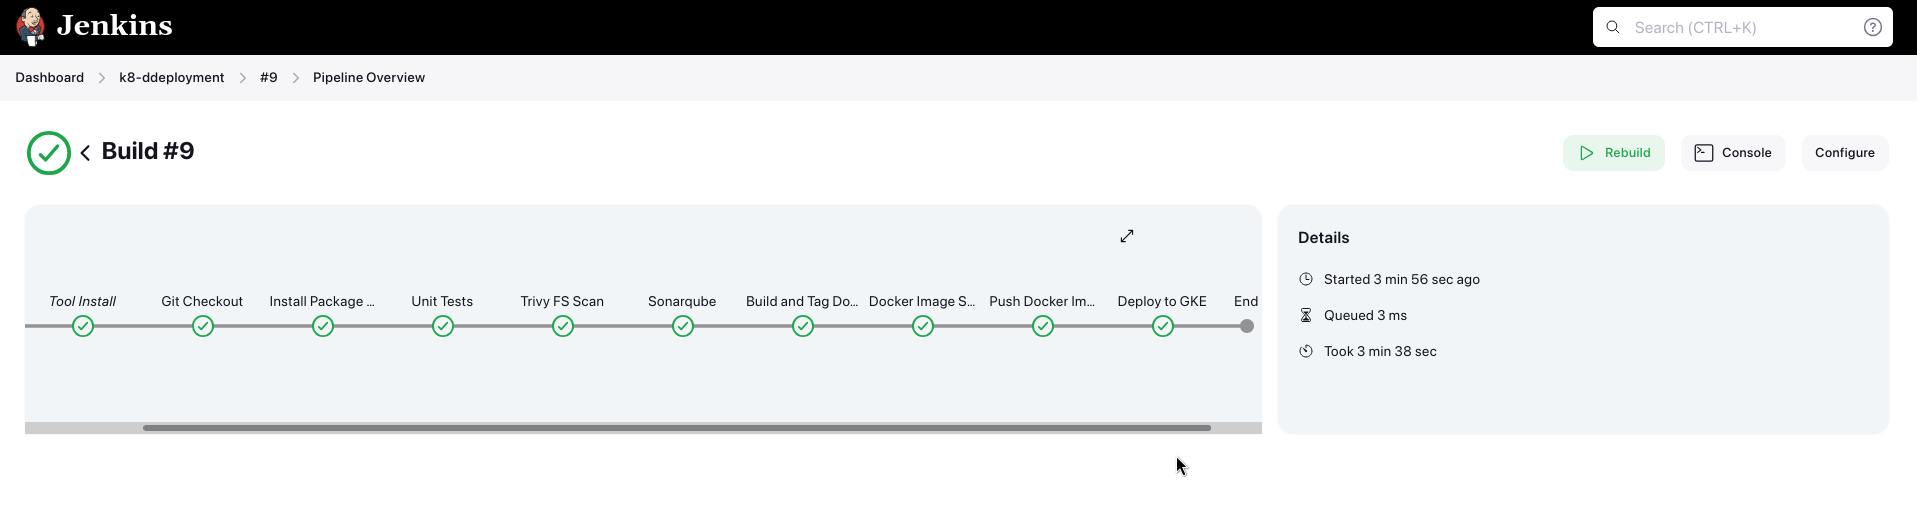
Now our app is deployed to GKE, let's check if backend is connected to DB or not:
  #To check all resources created
  kubectl get pods

  #To check if backend is connected to DB
  kubectl logs POD_NAME

  #Check if there is any problem with depoyment
  kubectl describe pod POD_NAME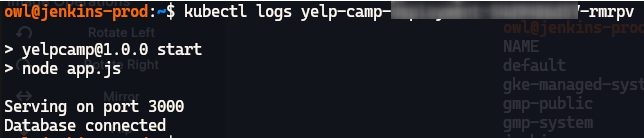
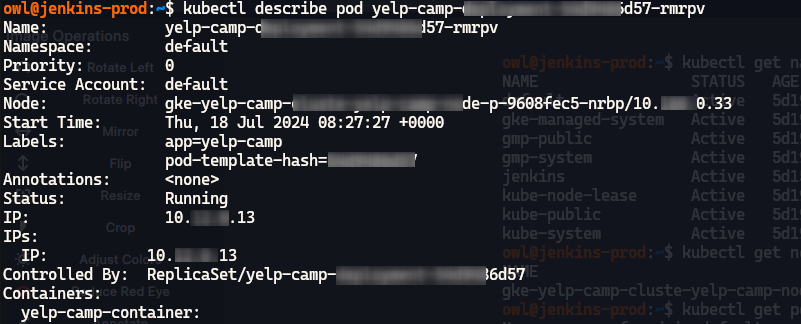
- Congratulations our app is deployed on GKE cluster and is running perfectly.
Conclusion
In this blog, we explored the intricacies of deploying a comprehensive DevOps project across multiple environments, from test and development to production. Through this journey, we've delved into the essential components and tools such as Docker, Kubernetes, GKE, and Terraform, highlighting their pivotal roles in modern application deployment and infrastructure management.
By leveraging a robust CI/CD pipeline, we ensured seamless integration and continuous delivery, streamlining the deployment process across environments. This project not only underscores the importance of automation and infrastructure as code but also demonstrates how these practices can lead to more efficient, reliable, and scalable deployments.
Throughout this endeavor, I encountered and overcame several challenges, each of which provided valuable insights and reinforced best practices in DevOps. The experience has been immensely rewarding, enhancing my skills and deepening my understanding of end-to-end deployment processes.
This project represents a significant milestone in my professional journey, showcasing my ability to design, implement, and manage complex deployment pipelines and infrastructure. As I look to the future, I am excited about the potential for further improvements and the opportunity to apply these learnings in new and innovative ways.
Thank you for taking the time to read about my DevOps project. I hope you found this exploration insightful and valuable. I am always eager to connect with fellow enthusiasts and professionals, so please feel free to reach out to me for further discussions or collaborations. Your feedback and suggestions are highly appreciated as they help me grow and refine my skills.
Let's continue to build, deploy, and innovate together!
Connect with me onLinkedInor check out the project'sGitHub repository. Feel free to leave your comments, questions, or suggestions below.